Get Started
Installation Guides
Installation guides contain the installation process and instructions for Date Picker. Please note that the installation process is the same across all the visuals. You can see the user guide here.
Setup
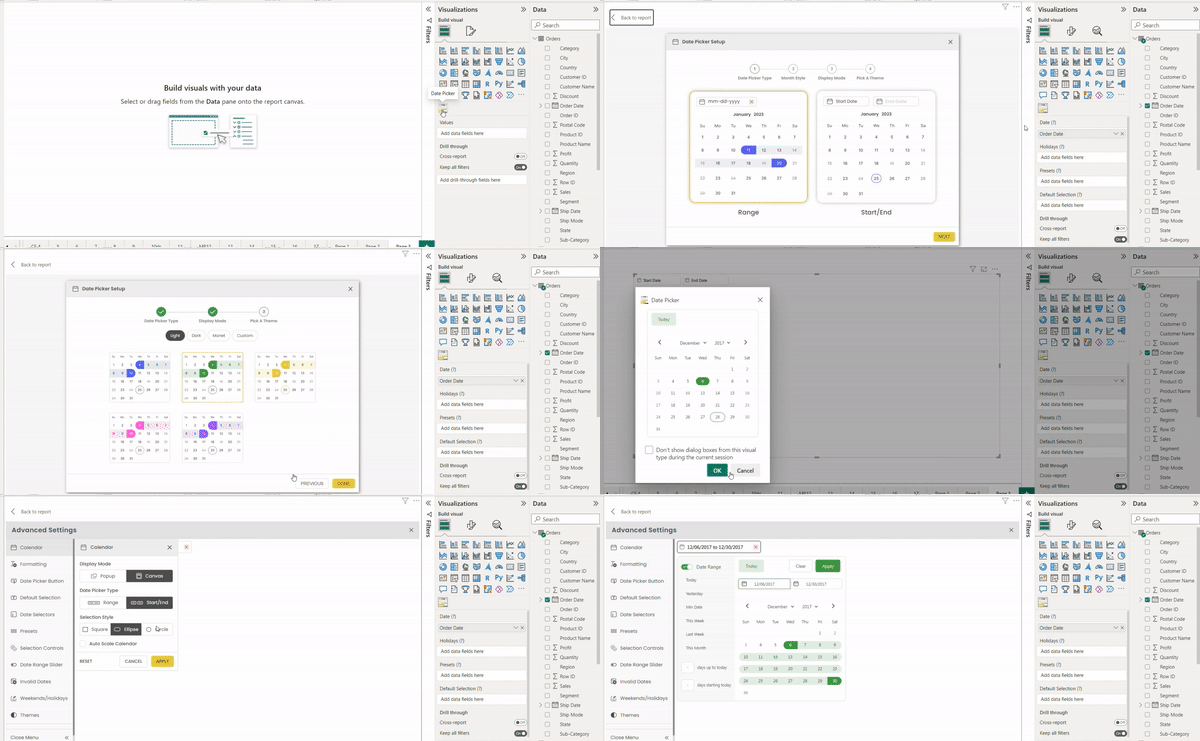
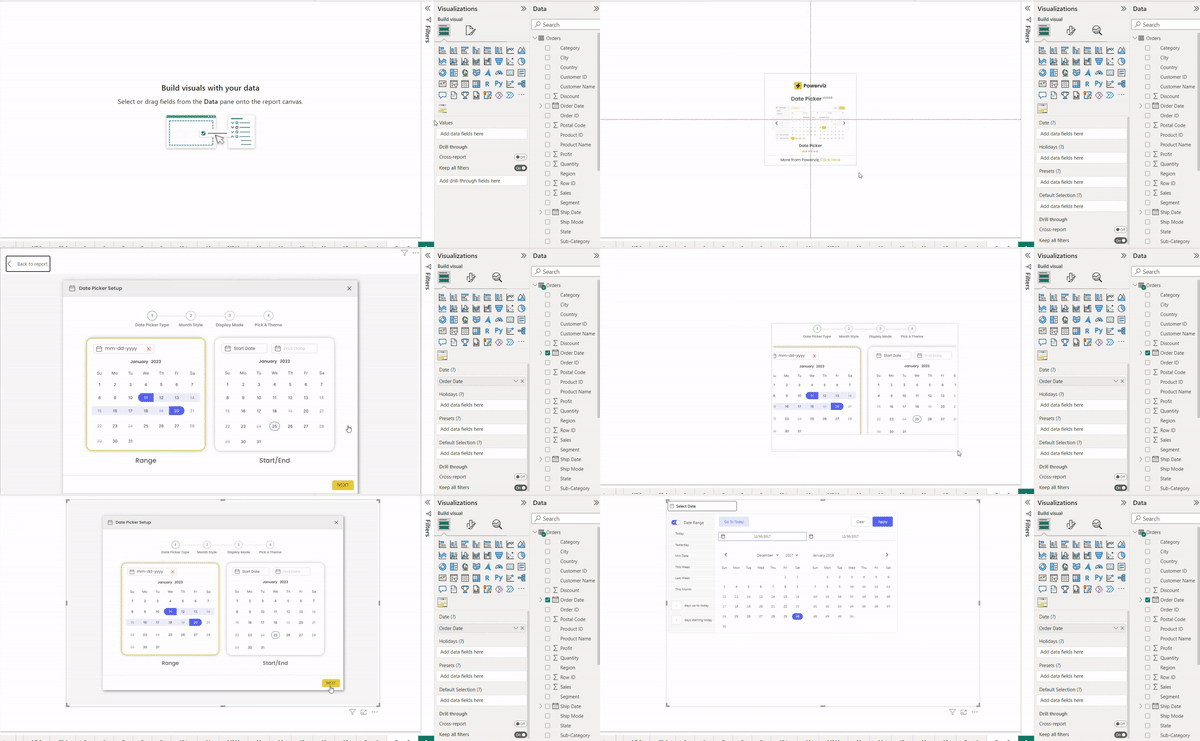
Now that you've successfully installed Powerviz Date Picker in Power BI, let's start creating the first date picker. Select and drag the date picker from the visualization pane to Canvas.
Follow the below steps to setup a Date Picker.
Step 1: Now that the date picker is on canvas. To proceed, drag and drop a date-type column into the
Date field, which will prompt the setup screen.Step 2: Here, you can choose your preferred date picker type, month style, display mode, and theme.
If you don't want to go through the process, simply click the "X" icon at the top-right corner.
Step 3: Once you've finished setting up your preferences, your new date picker will appear on the canvas.
Great job! You have completed the primary setup of the Date Picker.
For more customization, use the advanced settings option. Refer troubleshoot section if you're facing difficulty.

Field Requirements
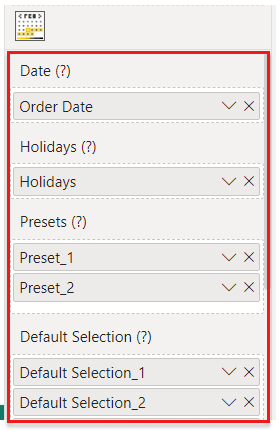
We have the following fields available in the Date Picker field tab:

Dates
[Complusory] A date-type column is required to start the visual.
Holidays
[Optional] The holidays field accepts a boolean (0/1) type column or measure where 1 is true and 0 is false. You can only add one column to this field.
The Holidays field allows you to highlight certain dates by using different formatting with icons. The dates can be from the company’s holiday list or a list of important events.
Use the below steps to add a custom holiday column.
Create a new measure or calculated column using the provided DAX formula. Enter 1 for holiday dates and 0 for others.
Drag this column in the holidays field.
Go to advanced settings and enable holidays.
Result: Holiday dates are highlighted.
IMPORTANT NOTES
Ensure that the custom column or measure is of numeric type (0/1).
Avoid using count and count distinct as aggregation types for columns, as they will display a count of all rows as 1.
Read this section to learn how to customize holidays.
Presets
[Optional] Presets field accepts a boolean (0/1) type column or measures where 1 is true and 0 is false. In Presets, you can add as many custom columns as you want.
TIP
Presets are only available for range picker types
Presets are pre-defined time ranges that users can easily select in the date picker. Presets typically include common time ranges such as "today", "tomorrow", "this week", "next week", "this month", "next month", etc. These presets can help with quick selection rather than making the user to manually select dates.
Please follow these steps to add a custom presets column:
Create a new measure or calculated column using the provided DAX formula. Enter 1 for preset date
Drag this column into the presets field.
Go to presets in advanced settings to add custom presets.
IMPORTANT NOTES
Ensure that the custom column or measure is of numeric type (0/1).
Avoid using count and count distinct as aggregation types for columns, as they will display a count of all rows as 1.
Read this section to learn how to add custom presets.
Default selection
[Optional] Accepts a boolean (0/1) type column or measure where 1 is true and 0 is false. This field allows multiple columns, but you can keep only one of them as the default selection.
The default selection feature refers to the time or date range that is automatically selected when the calendar is first opened or a new event is created. This default selection can be set to various time ranges, such as the current day, week, or month. The default selection feature can usually be changed in the calendar settings to better suit the user's needs and preferences.
Use the below steps to add a custom default selection column.
Create a new measure or calculated column using the provided DAX formula. Enter 1 for default selection dates and 0 for others.
Drag this column into the default selection field.
Go to the default selection option in advanced settings.
Select “based on field” from the dropdown.
Hit Apply.
Result: This period will always stay selected by default.
IMPORTANT NOTES
Ensure that the custom column or measure is of numeric type (0/1).
Avoid using count and count distinct as aggregation types for columns, as they will display a count of all rows as 1.
Read this section to learn how to add a default selection.
Troubleshoot
POINTS TO KEEP IN MIND
If you are having trouble setting up the Date Picker, make sure you have dragged and dropped a date-type column into the Date field.
The setup screen only appears the first time while setup a date picker. If it does not appear maybe that date picker is created before.
If you click on "Back to report", then resize the visual on the canvas screen to either complete the process or cancel it.
Make sure to choose your preferred date picker type, month style, display mode, and theme in the setup screen. Once you have finished setting up your preferences, your new date picker will appear on the canvas.
If you want to customize it further, use the advanced settings option.

Last updated